Estimated reading time: 18 minutes

The healthcare system in the United States is on the brink of collapse. In recent years, hospital closures have increased, while the number of doctors and nurses has decreased. This has led to longer waits for appointments, shorter visits with doctors, and a general decline in the quality of care.
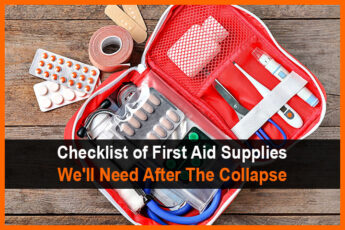
In a perfect world, we would never need first aid skills. But the world is far from perfect, and sometimes people get hurt. That's why it's important to know how to provide basic medical care in an emergency situation.
And while we hope that we'll never need to use these first aid skills, it's always better to be prepared. Here are some first aid skills you should learn before the healthcare system collapses.
Want to save this post for later? Click Here to Pin It On Pinterest!
1. CPR
CPR is an emergency procedure that is performed when someone's breathing or heartbeat has stopped. It is a life-saving measure that can be used to keep someone alive until more definitive medical treatment can be provided.
The basics of CPR are relatively simple and can be learned by anyone. However, it is important to note that CPR should only be performed if the person is unresponsive and not breathing normally.
The core elements of CPR include chest compressions and Rescue Breaths. Chest compressions are performed by placing the heel of your hand on the center of the person's chest and pushing down firmly.
Rescue Breaths are performed by tilting the person's head back and sealing your mouth over their nose and mouth. Once you have sealed your mouth, you should breathe deeply into their lungs and watch their chest rise. After performing 30 chest compressions and 2 rescue breaths, you should check for signs of life.
The most important thing to remember is to stay calm and act quickly. Every second counts when someone's life is on the line.
Here’s where to find more information and training near you.
2. How to Stop Severe Bleeding
One of the most important first aid skills to know is how to stop severe bleeding. There are three types of bleeding—capillary, venous, and arterial—and each one requires a different approach.
Capillary bleeding is the mildest form of bleeding, and can often be stopped by applying pressure to the wound with a clean cloth. If the bleeding is heavy or doesn't stop after a few minutes of direct pressure, it's time to move on to more aggressive methods.
Venous bleeding is characterized by steady, dark red blood flow. To stop venous bleeding, apply firm pressure to the wound with a clean cloth.
Arterial bleeding is much more serious than either capillary or venous bleeding. arterial bleeds are characterized by bright red blood that spurts from the wound with each heartbeat. To stop arterial bleeds, apply direct pressure to the wound with a clean cloth.
Here’s more information on how to stop bleeding.
3. Treating a Person in Shock
If you see someone who is pale, has a rapid pulse, is sweating, and has trouble breathing, they could be going into shock. If not treated immediately, shock can lead to organ damage and death. To treat someone in shock:
- Elevate their feet about 12 inches off the ground
- Loosen any tight clothing
- Make sure they're breathing
- Cover them with a blanket
- Don't give them anything to eat or drink
- If they're unconscious, place them in the recovery position
Here are a few more tips.
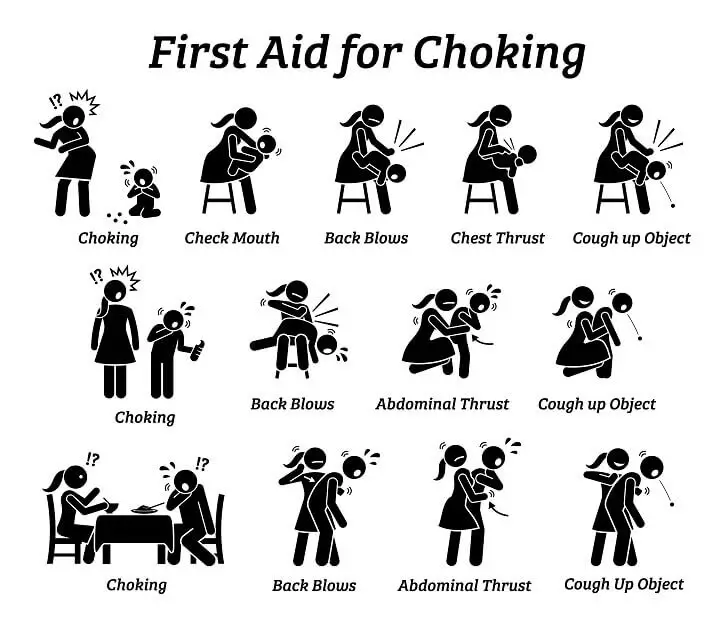
4. The Heimlich Maneuver
The Heimlich Maneuver is a lifesaving technique that everyone should know. It's used to dislodge an object that is blocking someone's airway. The best way to learn how to do it is by attending a first aid course or watching a video tutorial.
5. Choking First Aid for Toddlers
If your toddler starts choking, the first thing you need to do is assess the situation. Is your child coughing loudly and forcefully? If so, they're probably still able to breathe and you shouldn't intervene. However, if your child is coughing weakly or not at all, then you'll need to take action.
- To dislodge the object, deliver five quick, forceful blows between the shoulder blades with the heel of your hand.
- If that doesn't work, try abdominal thrusts. To do this, stand behind your child and place your fist just above their belly button.
- Grab your fist with your other hand and pull sharply inwards and upwards.
- Repeat this until the object is dislodged or your child starts coughing again.
Find more tips here.
6. Setting a Splint
In the event of a broken bone, it might be necessary for you to set a splint.
To do this, begin by assessing the injury. This will help you decide if setting a splint is necessary. If the person has a deformity or an obvious bone protruding from the skin, then setting a splint is essential. If there is no deformity and the person can move the limb without pain, then setting a splint is probably not necessary.
- Once you've decided that setting a splint is necessary, find something long and sturdy to use as your splinting material. A wooden board or even a large stick will work.
- Place the splinting material on either side of the injured limb so that it extends beyond the joint above and below the injury.
- Use cloth or tape to secure the splinting material in place. Make sure that the wraps are tight but not too tight – you don't want to cut off circulation to the injured limb.
- Finally, use a roller bandage to completely secure the cloth or tape in place. Again, make sure that this bandage is not too tight.
Here’s where you can learn more.
7. Identifying Signs of Stroke
In a healthcare emergency, every second counts. That's why it's important to know how to identify the signs of a stroke, so you can get the victim the medical attention they need as quickly as possible. Here are three things to look for if you suspect someone is having a stroke.
- Sudden weakness or numbness in the face, arm, or leg. This is usually accompanied by a drooping of the face on one side.
- Difficulty speaking or understanding others. The person may slur their words or be unable to say anything at all.
- Sudden dimming or loss of vision in one or both eyes. They may see double or have trouble seeing out of one side.
You can learn more here.
8. Treating a Burn
There are three degrees of burns: first, second, and third. First degree burns are the mildest and only damage the outer layer of skin. Second degree burns damage the outer layer of skin and the layer beneath it. Third degree burns damage all layers of skin and can even damage tendons, muscles, or bone.
Treating a first or second-degree burn is relatively simple:
- Hold the affected area under cold water for five to ten minutes or until the pain subsides.
- Apply a cool, moist cloth to the area for additional relief.
Here are some more tips on what to do next:
- You can also take ibuprofen or acetaminophen for pain relief.
- Avoid using ice, as it can further damage the skin.
- Don't pop blisters, as this can cause infection.
- Seek medical attention if the burn is larger than three inches in diameter or if it's on the face, hands, feet, groin, or buttocks.
- Third degree burns require immediate medical attention and can be very difficult to treat at home. If you have a third degree burn, cover the area with a clean cloth or bandage.
- Do not apply any ointments, lotions, or cream to the area as this could further irritate it.
- Do not try to remove burnt clothing from the area as this could cause more harm.
Find out more here.
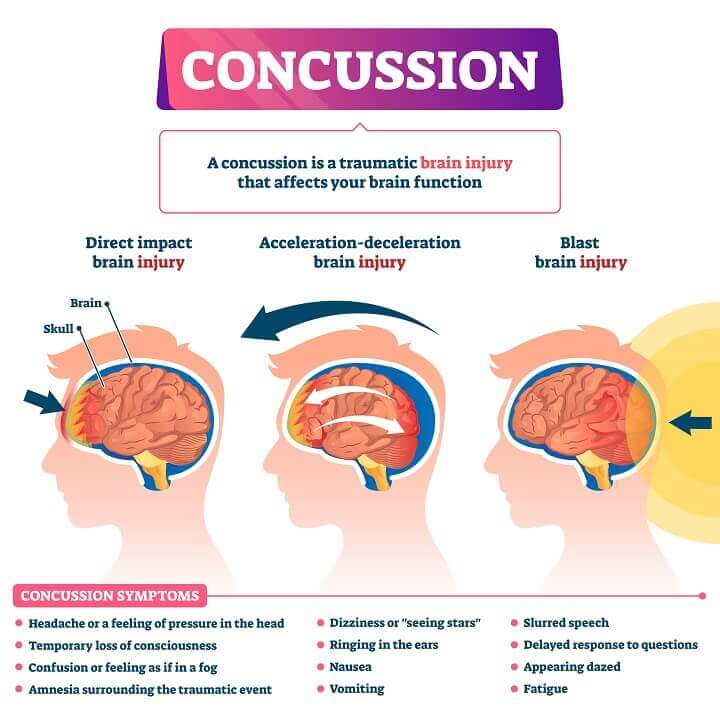
9. Identifying a Concussion
A concussion is a type of traumatic brain injury (TBI) that occurs when the head is hit by an object or violently shaken. Concussions can happen during car accidents, falls, and sports-related activities.
They can also occur as the result of explosive blasts and blunt-force trauma to the head. Symptoms of a concussion can appear immediately after the injury or may not be noticeable for days or weeks.
If you think someone might have a concussion, it's important to look for signs and symptoms such as:
- Confusion
- Delayed response to questions
- Dizziness
- Drowsiness
- Headache
- Nausea
- Slurred speech
- Vacant stare
- Vomiting
Here are some tips for home concussion treatment.
10. How to Suture and Stitch a Wound
In order to suture and stitch a wound, you'll need the following tools:
- Antiseptic wipes
- Needle
- Scissors
- Sterile gloves
- Thread
- Tweezers
Cleaning the wound is the most important part of the process because it will help prevent infection.
- To do this, start by using the antiseptic wipes to clean the area around the wound.
- Once that's done, put on your sterile gloves so that you don't introduce any bacteria into the wound.
- Next, you'll need to thread your needle. Cut a length of thread that's about 18 inches long and thread it through the needle.
- Tie a knot at the end of the thread so that it doesn't come undone while you're stitching.
- Now, you're ready to start stitching! Start by making small stitches in the skin around the wound, being careful not to pierce any blood vessels.
- Once you've gone all the way around, you can start making larger stitches through the middle of the wound until it's closed up.
- Tie off the thread and cut off any excess.
For more in-depth information, visit this link.
11. Supporting a Sprain
A sprain is a medical condition that occurs when ligaments stretch or tear. Sprains can vary in intensity from mild to severe, and the treatment you'll need will depend on the level of damage.
- The first step is to stop any activity that caused the sprain.
- If the person is weight-bearing, have them rest with their foot elevated on a chair or stool. For a non-weight-bearing joint like the wrist, simply keep it elevated above heart level.
- Once you've immobilized the joint, it's time to start RICE therapy. RICE stands for Rest, Ice, Compression, and Elevation.
- You've already taken care of the first two steps, so now it's time to compress the area with an elastic bandage. Be sure to not wrap too tightly, as this could cut off circulation.
- The last step is elevation, which you should continue until symptoms improve.
12. Treating a Seizure
A seizure is a sudden, uncontrolled electrical disturbance in the brain. It can cause changes in your behavior, your senses, and your consciousness. Seizures are generally not life-threatening, but they can be very scary for both the person having the seizure and for those who witness it.
That's why it's important to know how to properly treat a seizure if you ever find yourself in a situation where the healthcare system has collapsed.
Not all seizures are the same; the symptoms you experience during a seizure will depend on the type of seizure you're having. However, there are some general symptoms that are common to most types of seizures, including:
- Loss of consciousness
- Nausea and vomiting
- Tingling or twitching sensations
- Uncontrollable shaking of the body
To learn more about treating a seizure, check out this resource.
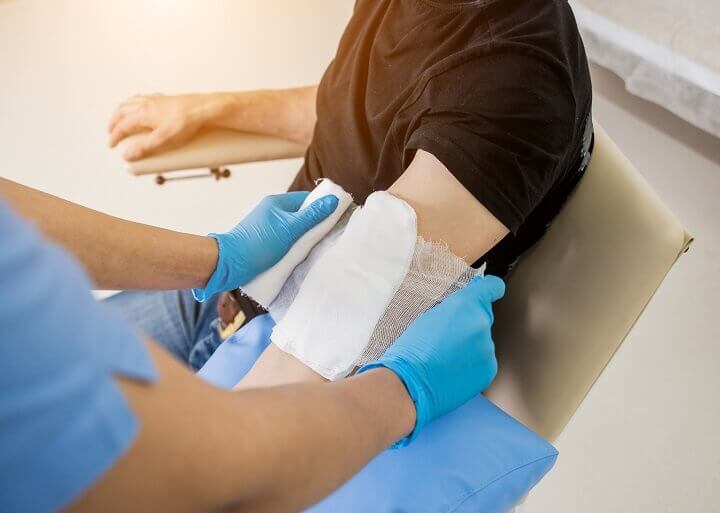
13. How to Clean a Wound
Unclean wounds are a breeding ground for infection, and in a world without hospitals or access to antibiotics, even a small cut could become life-threatening.
Here's a step-by-step guide on how to clean a wound:
- Stop the bleeding. If the wound is bleeding profusely, you'll need to take action to stop the bleeding. Apply pressure to the wound with a clean cloth or gauze pad. If the bleeding is coming from an artery, apply direct pressure to the area above the wound (toward the heart) to help stop the flow of blood.
- Irrigate the wound. Once the bleeding has stopped, it's time to irrigate the wound with clean water. This will help remove any dirt, debris, or bacteria that could cause infection. Use clean water from a bottle or stream; avoid using tap water, as it may contain bacteria or other contaminants.
- Cleaning around the wound. Use a mild soap and clean water to gently wash around the wound. Avoid getting soap in the wound itself; if possible, hold the soap off to the side so that only the water runs over the open area.
- Apply an antibiotic ointment. This will help keep bacteria from getting into the wound and will also speed up healing time. Be sure to use a thin layer; too much ointment can actually delay healing.
- Cover your wound with a bandage or gauze pad (if available) and secure it in place with tape or another type of adhesive bandage. Be sure to check your bandage regularly and change it as needed; if it gets wet or dirty, replace it as soon as possible.
You can learn more about wound care here.
14. How and When to Use a Tourniquet
A tourniquet is a first aid device used to control serious bleeding from an extremity. In an SHTF scenario, having the ability to properly apply a tourniquet could mean the difference between life and death. A tourniquet should only be used when direct pressure on the wound itself is not enough to stop the bleeding.
Applying a tourniquet is a simple process that anyone can learn with a little bit of practice. The first step is to find something long and strong enough to use as a tourniquet. A belt, necktie, or even a length of cloth torn from a shirt will work in a pinch.
Once you have your makeshift tourniquet, follow these steps:
- Position the tourniquet around the limb, as close to the wound as possible. The tourniquet should be applied not on bare skin but on top of clothing or another layer if possible. This will help protect the skin from further injury.
- Tie the tourniquet snugly in place, using whatever knot you are most comfortable with. A square knot or reef knot will work well here. Make sure the knot is tight enough that it will not slip loose but not so tight that it cuts off circulation entirely.
- Place a stick or other firm object under the knot and tie it in place. This will prevent the tourniquet from coming loose as you work on other aspects of first aid or wound care.
Learn more about tourniquets here, including when and how to remove them.
15. Treating a Fever
A fever is one of the first signs that something is wrong with our bodies. It's our natural defense against infection, but it can also be a sign of other serious illnesses. A fever is usually caused by a virus and can range in severity from slightly uncomfortable to deadly.
In a collapse situation, there may not be access to medical care, so it's important to know how to treat a fever.
First, it's important to identify if the person has a fever. A normal body temperature is between 36.5 and 37.5 degrees Celsius (97.7 and 99.5 degrees Fahrenheit). Anything above 37.5 degrees Celsius (99.5 degrees Fahrenheit) is considered a fever.
There are several ways to measure body temperature:
- Using a mercury thermometer – This is the most accurate way to measure body temperature, but mercury thermometers are becoming increasingly difficult to find.
- Using an ear or forehead thermometer – These are not as accurate as mercury thermometers, but they're more widely available. Be sure to follow the instructions that come with the thermometer carefully.
- Taking the person's temperature orally – This is not as accurate as using a mercury or digital thermometer, but it's an option if you don't have either of those available.
- Checking for other signs of a fever – If you don't have access to any type of thermometer, you can check for other signs of a fever, such as sweatiness, chills, or flushed cheeks.
Once you've identified that the person has a fever, there are several things you can do to treat it:
- Give them plenty of fluids – This will help prevent dehydration, which can be dangerous when someone has a fever.
- Dress them in light clothing – You want to make sure they're not too hot or too cold.
- Place them in a cool room – This will help bring their body temperature down.
- Apply cool compresses – You can use a washcloth dipped in cool water or an ice pack wrapped in a towel.* Never place an ice pack directly on their skin!
- Give them acetaminophen or ibuprofen – These medications will help reduce the person's fever. Be sure to follow the dosage instructions on the package carefully.
You can learn more about treating a fever here.
16. How to Treat Hypothermia
Hypothermia is a medical emergency that occurs when your body temperature drops below 95°F. When your body temperature drops, your heart, nervous system, and other organs can't work properly.
Symptoms of hypothermia include shivering, confusion, drowsiness, and fumbling hands. If left untreated, hypothermia can lead to cardiac arrest and death.
Hypothermia is most often caused by exposure to cold weather or immersion in cold water. The elderly, infants, young children, and people with chronic medical conditions are at increased risk for developing hypothermia.
However, anyone can develop hypothermia if they are exposed to cold temperatures for a long period of time. Here are a few tips:
- Get out of the cold. If you're outdoors, move the person out of the cold and into a warm room or shelter. If you can't move them out of the cold right away, cover their head, neck, and torso with blankets or coats.
- Monitor breathing. Check for signs of normal breathing and prepare to perform CPR if necessary.
- Warm the center first. Warm the person's chest, neck, head, and groin first—this area contains major blood vessels close to the skin. Apply warm compresses to these areas using towels soaked in warm water (not hot). You can also use your own body heat to warm these areas by lying close to the person (but not on top of them).
- Warm extremities last. Once the person's core temperature has increased, start warming their arms and legs last. Immersing extremities in warm water (not hot) helps increase blood flow throughout the body and warms faster than direct contact with air does—but don't use this method if there's any chance of that person going into shock.
- Watch for shivering and stop once it stops. Shivering is a good sign that warming is working—it means that the person's muscles are generating heat—so stop warming them once shivering stops since further warming could cause tissue damage from over-warming.
Learn more here.

17. Treating Diarrhea or Vomiting
When most people think of first aid, they think of bandages and CPR. However, there is one first aid skill that is often overlooked but is just as important: treating diarrhea or vomiting. With the current state of the healthcare system, it is more important than ever to know how to treat these conditions.
- The first step in treating diarrhea or vomiting is to stay hydrated. It is important to drink plenty of fluids, especially water, to replace the fluids lost through diarrhea or vomiting. Sports drinks can also be helpful in replacing electrolytes. If you are unable to keep fluids down, you may need to seek medical help.
- The second step is to eat bland foods. Foods that are high in fat or spice can aggravate diarrhea or vomiting. Stick to bland foods like crackers, toast, and rice until you are feeling better.
- The third step is to get rest. When your body is fighting off an illness, it needs all the energy it can get. Try to get as much rest as possible so your body can focus on getting better.
Learn more here.
18. Treatment for Allergic Reactions
The first step in treating an allergic reaction is to identify the allergen. Common allergens include pollen, dust, animal dander, certain foods, and drugs.
Once you know what you're dealing with, there are a few different treatment options depending on the severity of the reaction.
For mild reactions, such as hives or itchiness, over-the-counter antihistamines can be effective.
If the reaction is more severe, such as difficulty breathing or swallowing, then it's important to administer other treatments. Epinephrine injectors (also known as epi pens) are also considered first-line treatment for severe allergic reactions and can be lifesaving.
Learn more here.
19. Treating a Bloody Nose
A bloody nose is not a life-threatening condition, but it can be very alarming, especially if you've never dealt with one before.
- First, stay calm. Even if it looks like a lot of blood, this is not a life-threatening condition.
- Pinch the nose shut to stop the bleeding and lean forward so the blood doesn’t go down your throat.
- Apply firm pressure to your nose for five minutes, and apply ice to reduce swelling and pain.
Learn more about bloody noses here.
20. How to Treat Insect Stings and Bites
Insect stings and bites can be painful and even dangerous. That's why it's important to know how to treat them properly.
- The first step in treating an insect sting or bite is to identify what kind of insect it came from. This can be tricky, as there are many different insects out there, but there are some general characteristics you can look for.
- Once you've identified the type of insect, you can move on to treatment. Bee stings should be treated by removing the stinger as soon as possible. You can do this with a pair of tweezers or by scraping it off with a credit card.
- Once the stinger is removed, wash the area with soap and water and apply a cold compress to reduce swelling. Do not try to remove the venom sac yourself; this could make the situation worse. If you are allergic to bee stings, seek medical attention immediately.
Mosquito bites should be treated by washing the area with soap and water and applying a cold compress if needed. You can also try using calamine lotion or hydrocortisone cream to relieve itching.
Learn more about treatment for insect bites and stings here.
Final Thoughts
In today’s day and age, it is more important than ever to know basic first aid skills. With the healthcare system in decline, knowing how to perform CPR, use the Heimlich maneuver, and control bleeding can mean the difference between life and death.
There are many resources available online and in your community that can help you learn these skills. So don’t wait – take action today and learn these lifesaving skills!
Like this post? Don't Forget to Pin It On Pinterest!